I’m full of conflict today, y’all.
On one hand, I’m all about making everything from scratch, a) because food generally tastes better when I do this and b) doing so reduces wasteful packaging of pre-made stuff.
On the other hand, I absolutely hate making pie crust dough. The one dough recipe I have that I didn’t hate using years ago uses shortening, and so needs tweaking. I’m not a big fan of shortening – its texture freaks me out, and its history (or Crisco’s history, rather) of demonizing lard is not my favorite. But that, friends, is for another post. For now, I’ll just say lard isn’t as bad as you think it is (unless you’re a vegetarian. Then it’s obviously not your favorite), and I’ll be experimenting with lard for recipes that call for shortening in the future.
I digress. I’m not a fan making pie dough, and I dislike shaping pies. As I was just conversing with my mom the other day, it’s something that takes practice to get good at, and because I don’t like making it or practicing, I never get any better at it. Will I suck it up one day and practice so I can help y’all become better bakers? Sure. Do I have time to get better at it and write about it before our delightful eating holiday in two days? I don’t think so.
I will say, however, that making Homemade Crackers on a weekly basis has made me better and more confident about rolling out flaky dough, so maybe I’m just complaining for nothing. I’ll report back after this round of Thanksgiving baking, and hopefully while toting a good, reliable pie crust recipe sans shortening.
All this is to say that I normally make this recipe with a *gasp* refrigerated pie crust to make it easier on myself. I comfort myself in doing so with the fact that I don’t make it often enough to throw pounds of packaging away (literally, I make this once a year), and because there are so many other things to make from scratch at Thanksgiving. This year, I will actually use a homemade crust (and will report back, as stated), and you can feel free to use whatever flaky pie crust recipe works for you, but don’t feel bad if you use refrigerated crust. I don’t. Mostly. Just buy yourself a good one, won’t you?
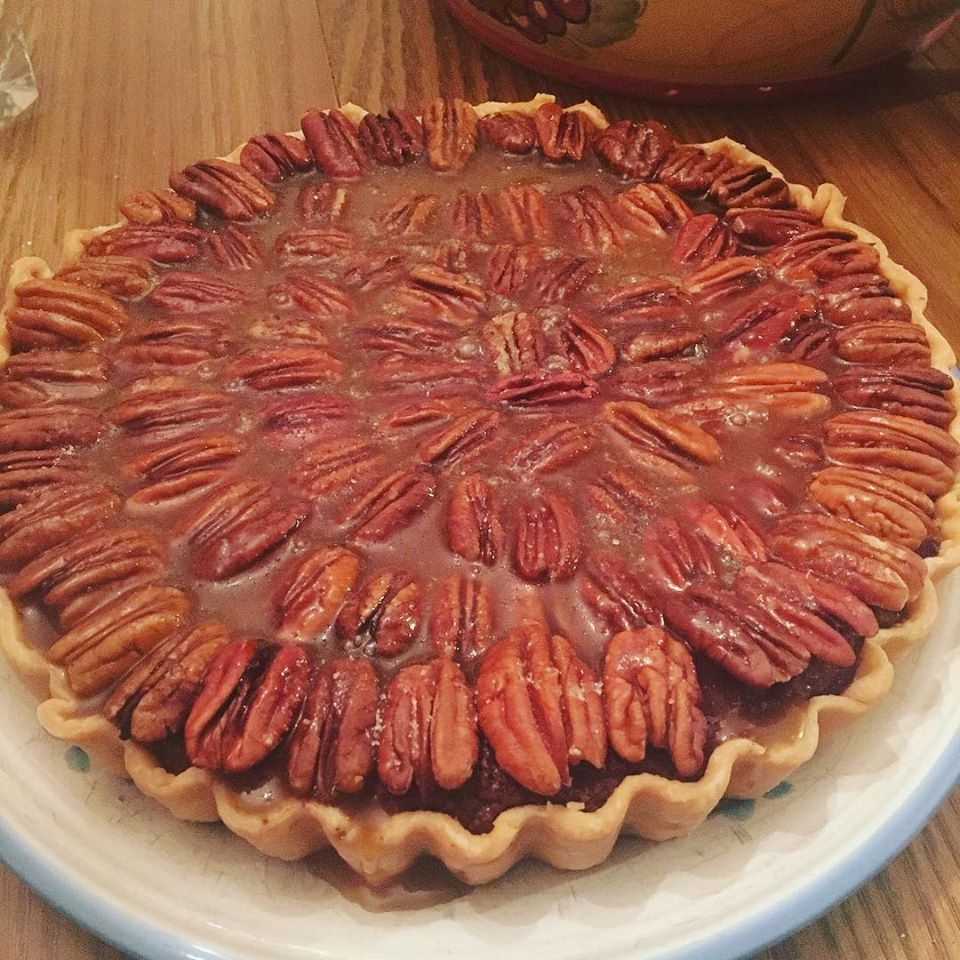
Also comforting is the fact that this is a tart recipe, not a pie recipe, which means the tart pan itself makes the presentation oh-so-lovely without much effort – just press the crust dough into the pan, fill, and voila! Pretty zigzags. Pretty awesome.
Now that we’ve gotten the dough talk out of the way, let’s actually talk about this tart.
Oh. My goodness. This tart is amazeballs. Firstly, you likely have most of the ingredients on hand in your pantry and fridge. Secondly, I have never had anyone not be floored by this dessert – it’s like eating a truffle in tart form, and is a nice contrast to the usual pumpkin pie on the dessert table, both in taste and appearance. Thirdly, it goes a long way – a sliver is enough to satisfy. Trust me on this one.
Consider this treat to have four separate components (three, if you’re making the aforementioned crust shortcut): crust, chocolate filling, pecans, and salted caramel topping. It is an assembly piece, but not a hard one, and so, so worth it.
Heads up – I’ll be back next Tuesday with more tasty goodness your way. Until then, I’ll be stuffing my face and enjoying the company of others. Until then, happy Thanksgiving!
Will this be your new Thanksgiving go-to? Let’s find out.
Chocolate Pecan Tart with Salted Caramel
Make your own crust dough, or use a refrigerated dough.
You will need:
- 1 unbaked Single-Crust Pie Dough (homemade or store-bought)
- 3/4 c (1 1/2 sticks) salted butter
- 1 1/2 c white sugar
- 1/3 c flour
- 1/3 c cocoa (the darker, the better, but Dutch process is fine)
- 1 tbsp light corn syrup
- 1 tsp vanilla
- 3 eggs
- 1 c finely chopped toasted and cooled pecans (see note below)
- 2 cups pecan halves (ideally not chopped, as they make a better presentation when left mostly whole, but it’s all going to get sliced anyway, right?)
- 1/2 tsp sea salt, fine or coarse
- Salted Caramel (recipe follows)
Directions:
- Preheat oven to 350 degrees F. Press pie dough into the tart pan, and prick with a fork several times to allow for even baking and prevent air bubbles.
- Melt butter and allow to cool briefly (3-5 minutes). In a large bowl, whisk together the melted butter, sugar, flour, cocoa, corn syrup, and vanilla until thoroughly combined. Add eggs, whisking until everything is thoroughly combined. Fold in 1 c chopped, toasted pecans. Pour mixture into the prepared tart pan.
- Bake the tart at 350 degrees F until the center is just set or nearly set, about 35-40 minutes. (It’s okay if it’s a big jiggly, as it will set more as it cools.) Cool completely on a wire rack, about 1 hour.
- Meanwhile, prepare the caramel (recipe below), and set aside.
- Arrange 2 cups of pecan halves on the cooled tart in whatever pattern you feel is best (spirals are pretty neat), overlapping as necessary if you want to use all of the pecans. Pour warm caramel on top of the pecans, and allow to cool and set for at least 10-15 minutes. Top with sea salt.
Salted Caramel Topping
This is a good, looser caramel sauce, perfect for topping tarts, pies and cakes. The addition of lemon juice in caramel sauce makes for a softer caramel that stays soft at room temperature and slices well without sticking to your knife and wreaking havoc. Why? Citric acid helps break down sucrose into glucose and fructose during the heating process, which doesn’t crystallize as easily as sucrose. SCIENCE!
You will need:
- 3/4 c white sugar
- 1/4 c water
- 1 tbsp lemon juice
- 4 tbsp (1/2 stick) cold salted butter, cut into tablespoon portions
- 1/3 c heavy cream
- 1/8-1/4 tsp sea salt, depending on how salty you want your caramel
Directions:
- In a medium heavy-bottomed saucepan (3-4 quart), combine sugar, water, and lemon juice, then bring to a boil without stirring. If there are sugar crystals on the side of the pan and they bother you, you can cover the pan briefly with a lid to melt them into the pot. Otherwise, leave them be, and leave your spatula or whisk out of this party for now.
- Continue to boil (the bubbles should be rapidly breaking on the surface), swirling the pan very carefully and occasionally to distribute the mixture in the heat, until the mixture turns dark amber (it should still be transparent), about 7-8 minutes. Watch this mixture carefully, and don’t even think about walking away from the stove or checking your phone – sugar can go from clear to burned very quickly, and it’s a huge pain to clean from your pan once it’s burned.
- Immediately remove the pan from the heat once it changes the proper color, and carefully whisk in butter and cream (the mixture will hiss and bubble). Keep stirring until the hissing and bubbling stops, thoroughly combining all ingredients. Stir in salt to taste. (If you are using this for the tart recipe, you will also be topping the tart with more salt, so keep this in mind when salting. I love salt, so this is no problem for me!)
Toasting Nuts
Toasting the pecans for the filling beforehand does make a difference in flavor and texture – they actually taste like nuts! You can do this in one of three ways:
- In a frying pan: Place pecans in a dry frying pan on medium heat, stirring frequently. Remove immediately onto a cool plate once they begin to brown or smell toasted.
- In the microwave: Microwave on high on a plate in 1-2 minute increments and stirring in between. Stop as soon as you can smell them and allow to cool.
- In the oven: Place pecans in a single layer on a baking sheet in a 350 degree oven for 5-10 minutes, flipping them once during baking with a spatula. Remove when they begin to brown or smell toasted.
Whatever method you use, follow your nose, and remove nuts immediately from the heat once you smell them – once the oils start cooking, the nuts can burn quickly. Cool completely before using in the recipe.

[…] probably wouldn’t swear at all: I’m just that kind of baker.) I used it to make the Chocolate Pecan Tart (I made it into a pie this time) from my Thanksgiving post, and it was delicious, I’ve gotta […]
LikeLike
[…] Chocolate Salted Caramel Pecan Tart […]
LikeLike
[…] Chocolate Pecan Tart with Salted Caramel […]
LikeLike