It’s January: the winds are blowing, the ice is flowing, and it’s time to start gardening prep!
I’m talking, of course, about starting seeds.
So you want to start your own seeds indoors? Groovy. Let’s talk about the why, what, and how of starting seeds at home.
- Why start your own seeds?
- What You’ll Need
- Choosing Seeds for Seed Starting
- Special Instructions: Stratifying & Scarifying
- Seed Start Setup
- Let’s Start Seeds!
- Hardening Off and Planting Out
Why start your own seeds?
Why not just buy seedlings from a nursery?
First of all, I’m not here to tell you not to purchase seedlings from a local nursery, farm, or cool local gardener. We’ve had fantastic results from purchased seedlings, and because they’re generally grown by seasoned gardeners and farmers, they tend to do very well if you plant them in recommended conditions.
For something that we only want a few of (say, eggplant, or a fruit tree, or a particular herb/flower), we take the buying route. We also make sure they’re cultivated locally and responsibly, and are not invasive plants.
However, sometimes we just want, nay, need twenty of something. We are pepper and zucchini fiends around here, we eat okra like it’s going out of style, and we love our zinnia bouquets. We also don’t want to spend hundreds of dollars on seedlings. So, seed starting is the way to go.
So, back to the original question: why start your own seeds?
- It’s (generally) less costly than buying seedlings. Seedlings cost upwards of $2-5 each on the cheaper end, while seed packets (which contain 20-100 seeds each, depending on the type) cost about the same per packet. Keep in mind that you will also be spending money on seed-starting soil, seed trays (although these can be recycled items – stay tuned!), and grow lights or a greenhouse situation. So, if you’re looking to grow lots of the same plant, this may be your bag.
- More freedom to grow different varieties. Want to try an heirloom tomato you’ve never seen in a nursery? Itching to help your local seed cooperative figure out an ultracross? Just want to grow fourteen different types of peppers? Seed starting is the way to go!
- Get a head start on growing plants. Maybe you already start some of your plants by direct seed (looking at you, okra and beans), but you know that certain other plants, such as peppers, tomatoes, and herbs, need longer germination in a warmer environment that your zone offers. Seed starting gives you an economical way to do this yourself, rather than waiting to see what the nursery will have available.
- Beat the nursery rush! Speaking of waiting for the nursery, if you’re like me, you’ve waited and waited for your favorite seedlings to be available, only to a) have all of the plants bought before you have the chance to get there, b) have only the scraggly seedlings left or c) find out the nursery didn’t grow them that year. Starting seedlings gives you more control, as well as peace of mind that you’ll get the seedlings you want.
What You’ll Need
Okay, cool, you’re convinced – you’re gonna start some seedlings! Let’s talk materials you’ll need.
- Seeds. Duh. I’ll talk more about this in a moment.
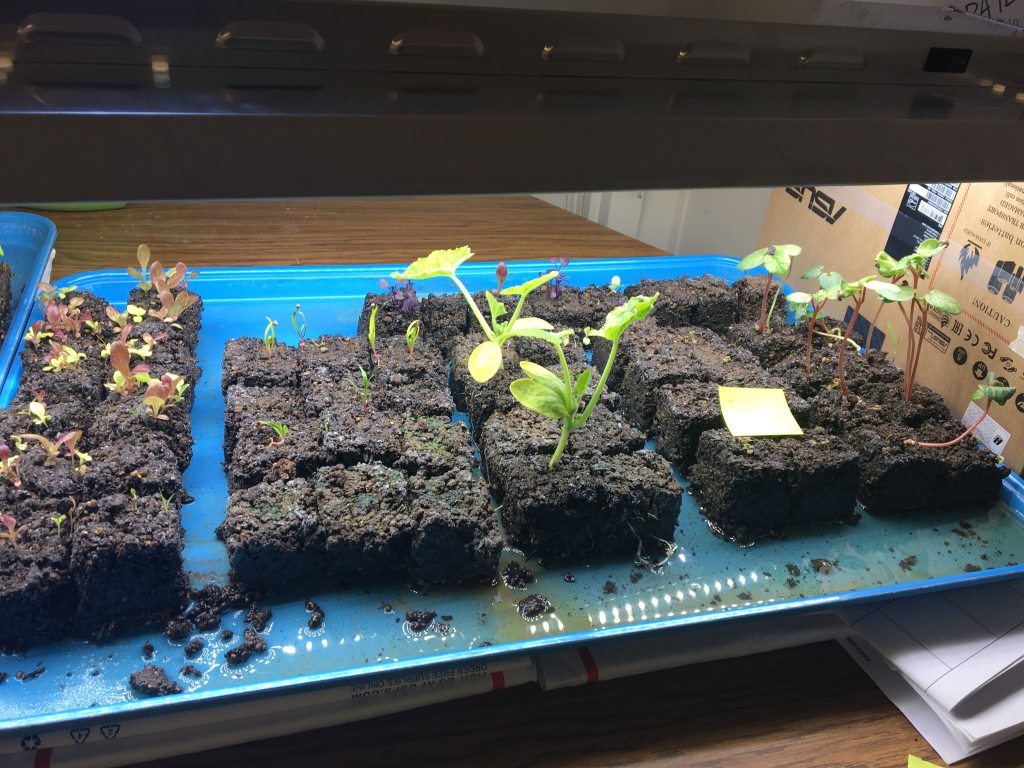
- Seed trays. You can purchase seed trays of many different materials (e.g. black plastic, paper, silicone, etc.) from a garden store. These trays will have little compartments for each seed type, as well as holes for drainage. You can also repurpose egg cartons, yogurt cups, or anything small that will either drain or that you can poke holes for drainage. We are particular fans of paper egg cartons, as the seedlings can be directly planted, carton section and all, into the ground. Heck, you can even go completely seed tray-less by using soil blocks (you’ll need a special block maker, which is pretty inexpensive).
- Trays or mats for holding seed trays. You’ll need to water your seedlings frequently, and I’m pretty sure you don’t want water all over the floor. We use repurposed cafeteria trays – these are great and the perfect size for larger seed trays, or several small trays, or several individual plants. You can also purchase mats from garden stores.
- Seed starting soil. Sure, you can use potting soil, or mix your own seed starting soil if you’re industrious. We’ve found that the soil marketed specifically for seed starting does make a difference in germination rates (i.e., how many seeds successfully grow to maturity), so it’s worth the money for us.
- Grow lights. While these aren’t 100% necessary for seed starting (you can technically grow seedlings indoors near a sunny window, or in a greenhouse), they do make for healthier, more robust seedlings. Seedlings grown near a window must be rotated frequently, and they tend to get “leggy” (that is, they spend most of their energy growing skinny stems in an effort to reach the sunlight, rather than growing robust leaves, etc.). You can also grow more seedlings in a small space with the right grow light setup.
Choosing Seeds for Seed Starting
Some plants are great for seed starting, some need to be started early, and some seeds like to be planted directly in the ground for best results. Read up on what plants you’d like to cultivate, and see which ones can be started from seed.
As I mentioned above, the plants we choose to start have the following characteristics:
- We want more than 2-3 of a particular plant
- The plants need longer germination periods than our climate zone allows for direct seeding
- The plants don’t mind being transplanted
- They’ve historically done well in our particular soil/setup
Some plants do better by direct seeding at planting time, and we don’t bother with starting them indoors. These are usually beans, corn, okra, and generally plants that have shorter, warmer growing seasons. Others don’t like being transplanted or have sensitive roots, like carrots, so they do best with direct seeding.
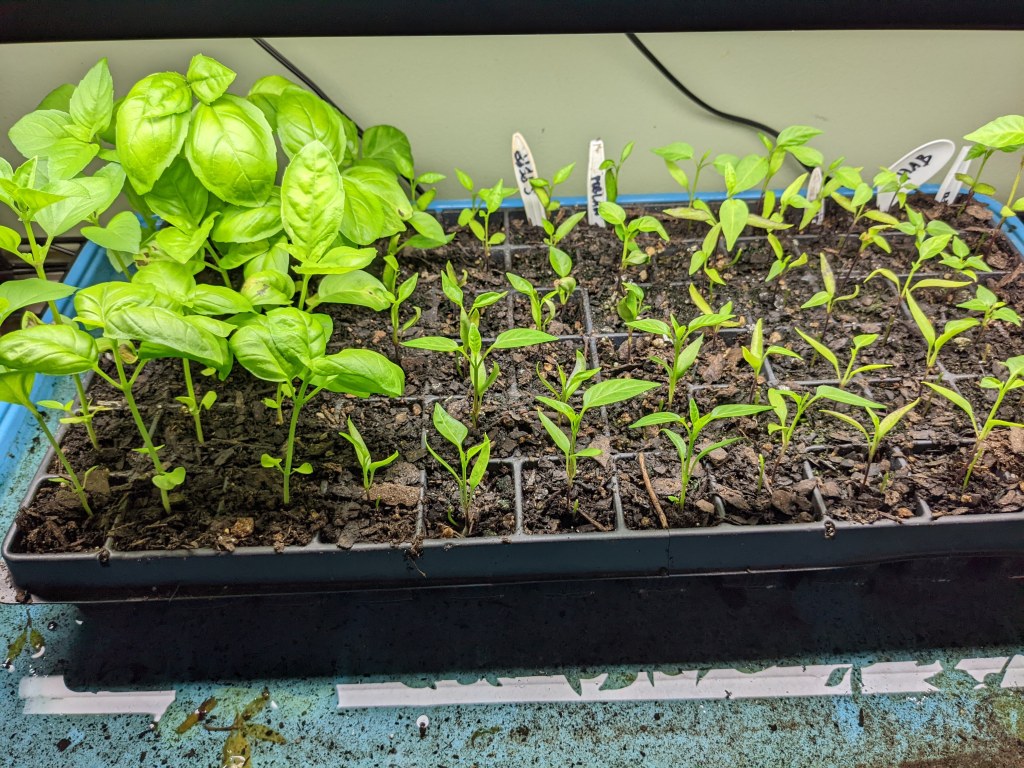
In the past several years, we’ve chosen to start peppers, tomatoes, and culinary herbs that we use in abundance (like basil and parsley). We’ve also more recently started flowers in pots, as they’re easier to recognize against the weeds that come up at the same time during the spring.
And, despite several pieces of advice that tell us to direct seed cucumbers and squash (because apparently they don’t like being transplanted), we’ve had better luck with transplanting because the slugs looooooove chomping on brand new Cucurbitaceae leaves growing in the soil. So, as always, I encourage some trial and error for your own garden.
For each type of seed, you’ll want to know the soil temperature, expected germination time, and sowing depth before starting. This information is almost always printed on the seed packet, and can easily be found in gardening books or a quick search online. Be sure to use a reputable gardening website – we like cooperative extensions, as well as the Farmer’s Alamanac.
Some plants need longer to germinate, while others pop up and grow very fast (looking at you, squash). You’ll need to plan out not only what you’ll grow, but when you’ll start it, and how much light it needs throughout the season.
Special Instructions: Stratifying & Scarifying
Some seeds must be started indoors (or sown very, very early in specific soil conditions), and even have special directions, such as stratifying and scarifying.
Stratification: Many varieties of herbs and flowers benefit (and sometimes require) stratifying, or cold germination, before planting, because they over-winter in the wild. These include parsley, dill, lavender, and sochan. You can technically achieve this by planting them in the fall, but you’ll have more controlled germination rates indoors. You can cold stratify seeds by wrapping them in a damp (not soaking wet) towel, placing the towel in an open zip-top bag, and keeping it in the back of the fridge for the recommended stratification length.
Scarification: Plants with very hard seeds, such as nasturtium, peas, and moonflowers, benefit from scratching or lightly cutting into the surface, also known as scarifying. This helps the germ inside of the seed husk break through when soaked. You can do this by scratching an X into the seed husk with a metal nail or sharp knife. Just be careful not to cut through the whole seed (or your hand)!
Normally, these plants need a longer period under the grow light, too, and some can be planted out in early spring (even before the last frost), so start these types of seeds in mid- to late winter.
Seed Start Setup
You don’t have to be fancy, and you can grow a lot of seedlings in a small space. We’ve have a few different setups:
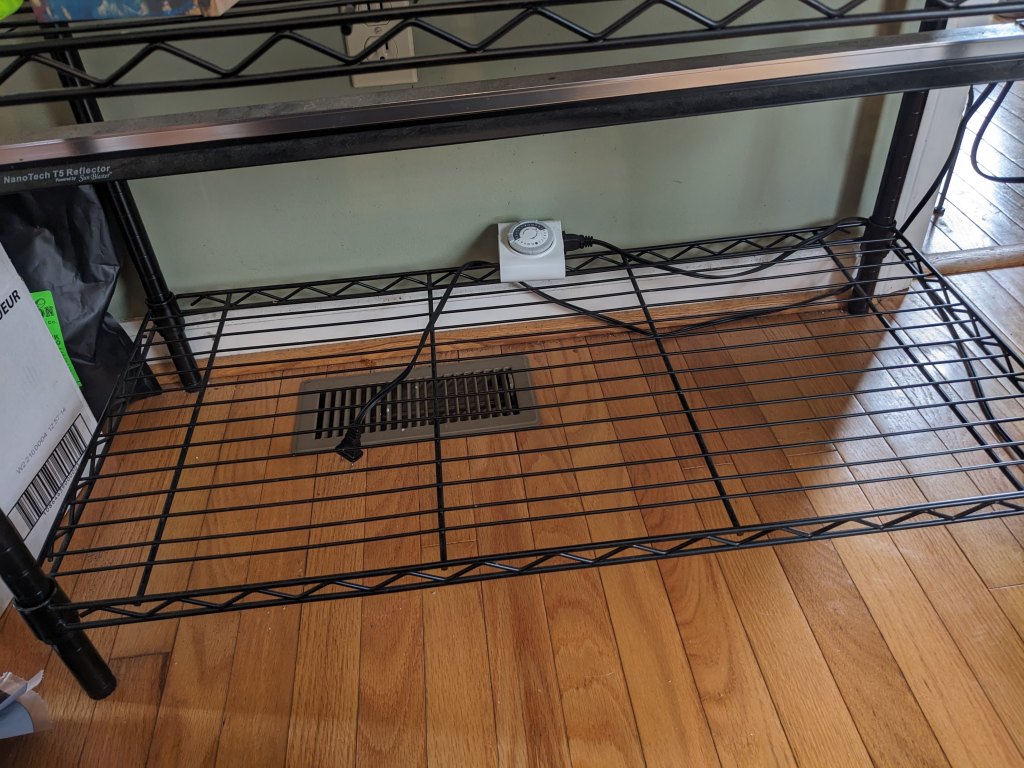
We use small metal pantry shelves (they hold a good deal of weight, and cost about $30-40), and tie the grow lights above the seed trays using zip ties. We also use a plug timer, so that we don’t have to remember to turn the lights on and off, and we can control the number of hours of daylight the plants get.
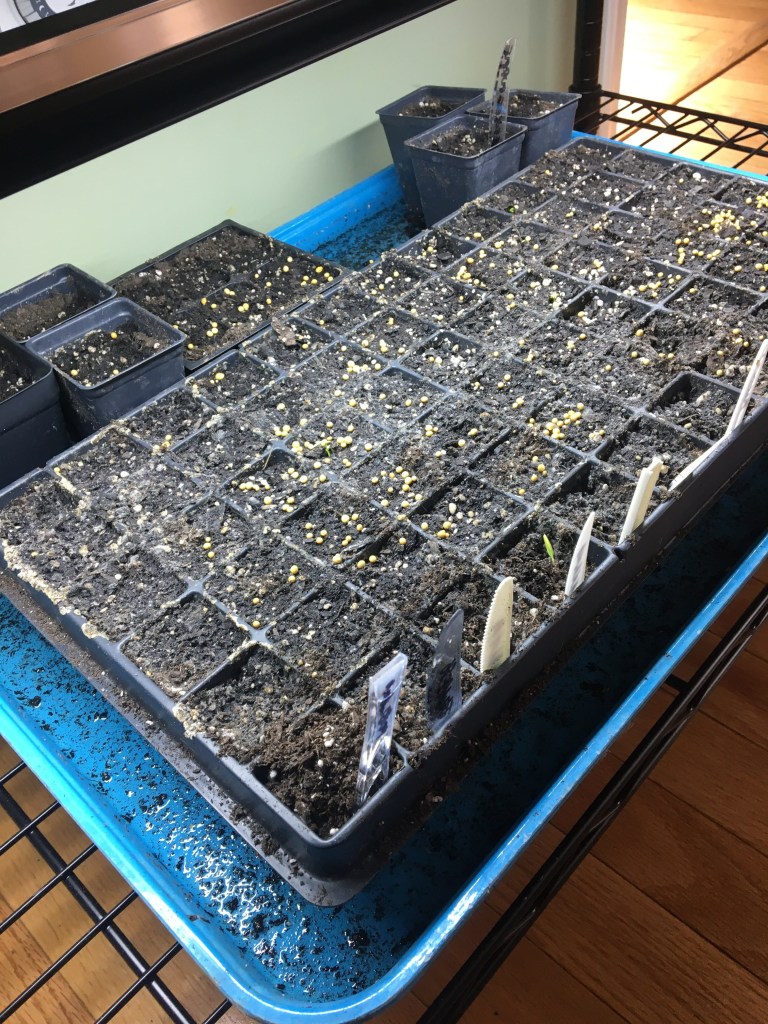
The cafeteria trays are great because we can water the seed trays without pouring water on top of delicate seedlings – we just water the trays themselves, and the drainage holes in the seed trays allow water to soak the soil as needed. You can size up or down based on your needs, and there are different grow lights available (bulb and tube).
Lastly, keep the setup away from active pets and small children – water and electricity don’t mix, and a seed setup uses both in close proximity. Also, some cats (who will remain nameless) enjoy using soil as their litterbox. Multiple times. And the plants do not appreciate the hyper dose of nitrogen.
Let’s Start Seeds!
You have everything you need – let’s get to starting seeds! The basic steps:
- Use clean seed trays. If you recycle seed trays or plant containers, make sure these are sanitized. You don’t want last year’s possible fungi or other plant disease agents infecting this year’s crop.
- Fill your trays with seed starting soil. Make sure they’re well-filled – the soil will compact once they’re watered, so don’t be shy.
- Plant your seeds. Pay attention to seed depth instructions, as well as needs for soil. Some seeds do well in shallow containers, while others need more room for roots.
- Water regularly and gently. Water around (rather than atop) delicate seedlings, and keep them moist (not soaking wet).
- Accommodate lighting needs. Make sure each type of plant is getting the right amount of light and heat. Some plants (like peppers and tomatoes) need 12-16 hours of light and heat, while brassicas (cabbages and the like) only need 8-12 hours and prefer cooler conditions. Plan and plant accordingly. Use a timer if it helps.
- Move and rotate seed trays as needed. At first, I position my seedlings very close (about 1-2 inches) below the grow lights to ensure even coverage and plenty of light, then gradually move the trays down as the seedlings pop up. I also rotate the trays throughout their growth, and transplant seedlings into larger growing containers as needed.
Hardening Off and Planting Out
So you’ve successfully started, germinated, and cultivated your garden plants. Hooray! Now it’s planting time. Before you get them into the ground or in outdoor containers, you must harden them off.
Like any living entity, plants can’t just be thrown into the wild with no warning. I liken this to being taken out of my cozy home and thrown into a campground, but with no tent, supplies, or training. Sure, I might survive, but I’m not going to be happy or healthy.
Your seedlings have lived in a sanitary, climate-controlled environment with no danger from wind, insects, or animals for weeks, possibly months – they need time to acclimate to the outdoors before living there. They’re not just going to be unhappy – they’re likely to die without proper preparation, and all of your hard work will have been for naught.
Hardening off takes about 1-2 weeks at minimum, but it’s worth it for healthy, thriving plants. Here’s how to do it:
- Be sure to start when weather conditions are stable, and outdoor temperatures will accommodate your plants. Don’t harden off during severe weather (including gusty days) and make sure the temperatures won’t drop below freezing.
- Place plants in a shaded area away from wind gusts. Placing them under direct sun risks frying the seedlings, even on cooler days, and wind gusts can break them.
- Gradually increase the time outdoors. On Day 1, place seedlings out for 1 hour. On Day 2, place seedlings out for 2 hours, and repeat, increasing the time by 1 hour each day until they can stay a full day and night outdoors. (Once they’re been out for 8-12 hours during the day, I let them go at night – they’re plants, not newborns.) Take them in at night if the temperatures fall below freezing (or temps below what the plants can take).
- Your seeds are now ready for planting!
I hope this has been helpful for all of your seed-starting needs. Got a seed-starting question? Planting anything cool this year? Leave it in the comments!
Until next time, stay safe, and happy homesteading!
